| Points in favor |
Points against |
| Comprehensive Scan |
Advanced functionalities associated with costs |
| Constantly updated vulnerability data base |
Resources required for intensive scanning |
| Intuitive and easy-to-use graphical interface |
Possibility of generating false positives |
| Programming and customization |
Possibility of generating false positives |
| Programming and customization |
Potential for conflicts with firewalls and intrusion detection systems |
| Ability to integrate with other security systems |
Dependence on the quality of the vulnerability database |
| Cross-platform support, including Windiows, Linux and macOS |
| Generation of reports that include recommendations to mitigate and correct security flaws |
As mentioned in the positive aspects of this tool, its management is carried out through a graphical user interface. This interface offers access to all Nessus functions and features in an intuitive and simple way. Next, the main elements of the tool will be described, since a detailed explanation could require another post:
1. Dashboard: The dashboard is the home page of Nessus and provides key information such as the number of hosts scanned. From here, users can quickly access recent scans, reports, and other important areas of the tool.
2. Scans: This section allows users to configure and run scans. Users can schedule automatic scans, perform manual scans on demand, import and export scans, and review the progress and results of scans in progress. They can also view a history of previous scans and take actions such as pausing, stopping, or restarting scans as needed.
3. Reports: By accessing a scan, users can review and generate detailed reports on the scans. Reports can be customized to include specific information and recommendations. Users can export reports in various formats, such as PDF, CSV, and HTML, for sharing.
4. Policies: Policies are predefined sets of rules and settings that determine how scans are performed. Policies can be created and customized to fit the specific needs of the organization's context. These policies can include settings such as the risk level to scan, the types of vulnerabilities to look for, and the hosts or networks to include in the scan.
5. Configuration: This is where users can configure tool-specific options and settings, such as device settings. server, authentication settings, and notification options. They can also manage users and roles, set data retention policies, and configure integrations with other security systems.
Practical case
Since a picture is worth a thousand words, a practical demonstration of the use of the tool will be carried out. The proposed scenario is the following:
Using Nessus
From the machine designated as "Scanner", Nessus will run. The target of the analysis will be the machine known as "Victim." Once the analysis is completed and the corresponding report has been obtained, from the machine identified as "Attacker", an attempt will be made to exploit any of the vulnerabilities detected in order to gain remote access.
First of all, from the “My Scans” section, we define a new scan by clicking on the “New Scan” button:
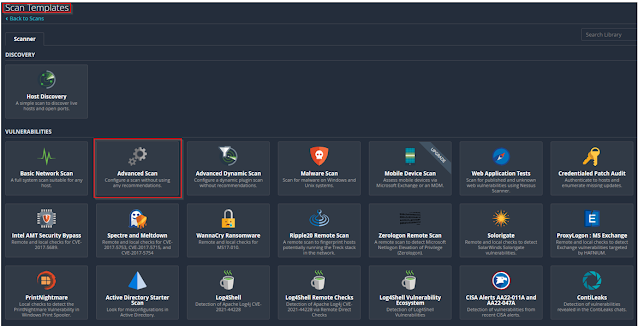
After clicking, a new window will open with the title "Scan Template". Here, the option to perform a host discovery will be offered, where a basic scan checks which hosts are operational and which ports they have open within the same network range as the machine where Nessus is running. You can also choose to run various scripts to detect vulnerabilities.
In this case, an "Advanced Scan" will be carried out to ensure that the analysis is as comprehensive as possible:
Once here, various parameters can be established, of which only two are mandatory: the name to be assigned to the scan and the objectives. However, you can also specify the folder in which you want to save the scan, in case you want to organize them, for example by the audited organizations, or who to notify, schedule the scan, indicate credentials if necessary, select plugins to use , among other options. For this test, a very basic analysis will be carried out where only the name of the scan will be specified, which in this case will be "ZeroTry", and the address of the target, which is the "Victim" machine of the previously shown scenario, with the IP address 192.168.138.1:
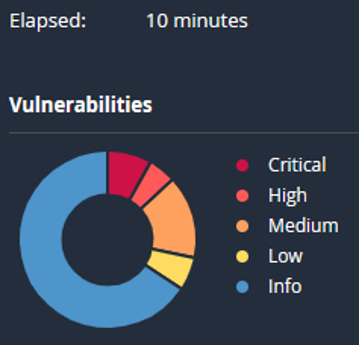
In reference to the test, it is observed that the duration of the scan was 10 minutes, the scoring model used is CVSS 3.0 and a total of 181 vulnerabilities have been identified, categorized as 12 critical, 7 high, 24 medium, 8 low and 130 information.
1. Vulnerabilities: List of all vulnerabilities found, ordered by severity. In this case, it is not distinguished by host, but rather all of them are collected. For each one, information will be provided on the severity and the associated CVSS, the Vulnerability Priority Rating (VPR) to determine the correction priority, the name of the vulnerability, the family to which it belongs and the number of times it has been found.
Additionally, clicking on any of them will display more detailed information, such as the description, the proposed solution, the possible way out after exploiting the vulnerability, the associated CVE, and other additional details.
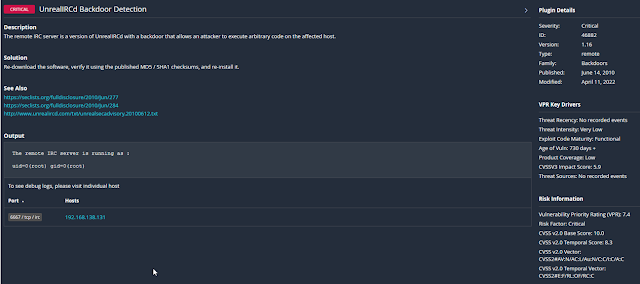
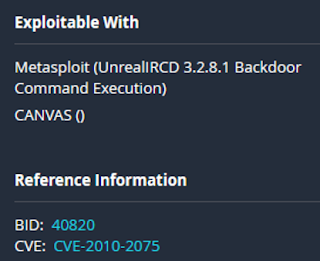
In this case, you can see that the machine has a vulnerability from the Backdoor family whose name is UnreallRCd Backdoor Detection, that is, it has exploited the UnreallRCd service in version 3.2.8.1 running on port 6667. This service tries to An Internet Relay Chat (IRC) server software that allows you to establish and manage online chat rooms to complete communication in real time. The vulnerability has the following CVE associated with it, CVE-2010-2075. The publication date of said vulnerability was 06/15/2010 and its last modification was 06/18/2010 and was reported by Red Hat, Inc. More information can be found on the NIST website (https://nvd. nist.gov/vuln/detail/CVE-2010-2075). The vulnerability consisted of a backdoor that allows attackers to execute commands on the server as the root user. The vulnerability was introduced in the DEBUG3_DOLOG_SYSTEM macro. This macro is used to log debug messages to the file system. An attacker with access to the source code modified the macro so that instead of logging a message, it will execute an arbitrary command.
2. Remediations: A list of recommended actions is presented to address certain vulnerabilities, specifying the action to be taken, the vulnerabilities that would be corrected and how many hosts each action should be applied to.
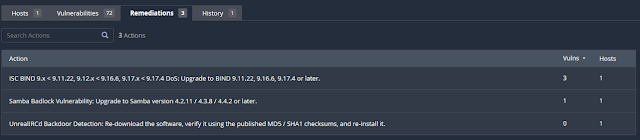
In this case, it is recommended to perform 3 actions to correct vulnerabilities in the UnreallRCd, Samba and ISC services.
3. History: List of times the scan has been executed.
4. Report: Possibility of exporting a detailed report of the identified vulnerabilities, allowing the option to configure various features to detail the information and choose the desired format.
This report is organized into several sections according to the number of hosts scanned and compiles all vulnerabilities, providing information similar to the "Vulnerabilities" section.
Exploitation from KALI
After the scan carried out with Nessus, numerous vulnerabilities have been identified. To verify its existence, an attempt will be made to exploit the UnreallRCd service from a Kali machine using the Metasploit tool.
By scanning with Nmap, it is possible to find out that the service is running on ports 6667 and 6697:
Using the Metasploit tool. We search for a module that could exploit a possible vulnerability in this service with search UnrealIRCd, and find the following:
It can be seen that the version to be exploited by the Metasploit module is 3.2.8.1, coinciding with what Nessus reported. Once the module to use is known, it is selected with use 0.
Once this is done, the mandatory options that the module needs to exploit the service are consulted using show options:
As you can see, it is required to configure both the port and the IP address of the remote host, that is, the victim. There is no need to modify the port as it matches the open port on the victim machine. However, if it is necessary to set the RHOST option, use the set RHOSTS 192.168.138.131 command.
Although it does not seem to be mandatory, it is important to consult the payloads available in said module and choose the most convenient one. This is achieved with show payloads:

A total of 13 payloads are seen, the first (id 0) (payload/cmd/unix/adduser), used to create a new user, and the sixth (id 5) (payload/cmd/unix/generic) designed for the execution of generic commands. The rest allow you to generate a reverse shell from various services. Of all the available options, I chose to select the seventh (id 6) (payload/cmd/unix/reverse) and because of this, it was necessary to indicate the IP address of the attacking machine.
Once the options are configured, the payload is executed and remote access is achieved to the victim machine under the root user:

With this, the potential and effectiveness of the Nessus tool has been appreciated.
Alternatives
There are several alternatives on the market for performing vulnerability scans, and although Nessus offers great potential, especially in its paid versions, it is prudent to consider other available options:
1. OpenVAS (Open Vulnerability Assessment System): Open source vulnerability scanning tool that offers functionalities similar to Nessus. Provides vulnerability scanning across operating systems, web applications, and databases, along with the ability to schedule scans, generate detailed reports, and perform security analysis.
2. Rapid7 Nexpose: Vulnerability management tool that offers vulnerability scanning in systems, networks and web applications. It provides advanced functionalities such as credential scanning, configuration analysis, and correlation of vulnerabilities with active threats.
3. Acunetix: Web security scanning tool that specifically focuses on identifying and remediating vulnerabilities in web applications and web services. It offers automatic web application scanning, SQL injection scanning, cross-site scripting (XSS) scanning, and OWASP Top 10 vulnerability detection.
4. Nikto: Open source tool to scan web servers for vulnerabilities and suboptimal configurations. It focuses on identifying common security issues, such as misconfigured configurations, exposed configuration files, and outdated software versions.
5. ZAP: Open source tool developed by OWASP (Open Web Application Security Project) used for security testing in web applications. It offers vulnerability scanning and penetration testing capabilities designed specifically for web applications. ZAP allows users to identify and exploit common vulnerabilities, such as SQL injections, cross-site scripting (XSS), and other security vulnerabilities in web applications. Additionally, ZAP provides an intuitive graphical user interface (GUI) and scripting capabilities for security testing automation. It is a popular and widely used tool by security professionals and software developers to improve the security of web applications.
Conclusion
Finally, Nessus is a tool to identify and evaluate vulnerabilities in computer systems. Its easy-to-use interface, updated vulnerability database, and ability to customize scans prove to be very useful both for pentesters in their task of identifying vulnerabilities and for organizations in the task of protecting their environment. However, the existence of paid versions limits its accessibility and potential, especially for individuals and companies with limited financial resources.
And so concludes the introduction and testing of Nessus. I hope it was an enjoyable read and easy to understand. I hope you enjoyed and that this is not my last post!